
Artificial Green Wall - India
We have been importing and installing artificial green walls for the last 3 years now. This article gives some details about the process.
Why Artificial Green Walls? Honestly, Natural Green Walls are the best. Nothing can beat nature's beauty. There is a lot of pleasantness that comes with having natural Plants around you. So even before you think of installing artificial green walls think about whether a natural green wall would be the right option for you. If you the time, money, and resources to maintain a natural green wall go for it. But if not, this is a good option.
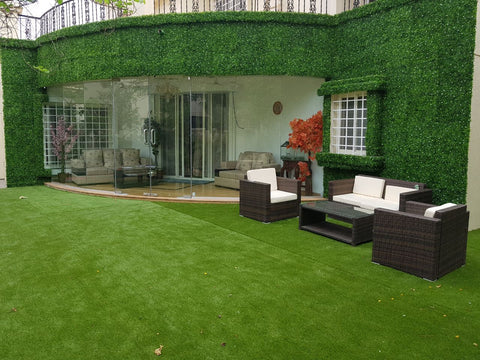
With these artificial green walls, you can make the best of your walls by greening with luscious artificial green wall tiles and transform your home into a beautiful relaxing sanctuary. You can choose from a range of different available options.
Check out the complete range here
Below are some of the benefits of Artificial Green Walls.
- Practically maintenance-free. No watering or weeds
- Easily installable on any wall, indoor or outdoor, without the limitations of sunlight or the confines of space
- Cost-efficient
- Stays green & luscious for many years
- Helps your eyes relax - gazing at the color green has been to reduce eye strain
So once you know that you want to go for the Artificial Vertical Gardens - What is the process from there on?
- Determine whether you will need UV Protected Tiles or Non - UV protected Tiles. UV Protected Tiles are used for outdoor installations. The UV Protected tiles that we sell on our website come with a 3 years warranty against color fading. However, UV-protected tiles are in general a little expensive as compared to the Non - UV-protected tiles. The Non- UV protected tiles can be used for Indoor Purposes only.
- Once that's done determine your wall area. Take the dimensions of your wall and determine its area.
- Also, it's important to figure out whether the wall that you are going to install is ready or not. ? Or if you are not installing it on the wall then is the other back support ready?
- The next step is to think about the design. Once you have the area of the wall, the second step is creating a design for the artificial vertical gardens. The lesser the no of patterns you use on the wall the more natural it looks. As a thumb rule combine no more than 3-4 tiles on one wall. You can choose the tiles from the available nos, and create a color combination you like. Sketch like the one below or a CAD file would serve the purpose.
- Calculating the No of Tiles Required. Once you have the design ready, calculate the no of tiles required. If it is patten then calculate the quantity for each tile separately. For eg: if the wall is 80 sq ft and the tile area is 2.78 sq ft, then the no of tiles required would be 28.77 = 29 tiles.
- Getting the wall surface ready: We recommend that the place where the artificial vertical garden is to be installed the surface be painted green. This will give a denser look and would look more natural. The tiles have some gaps for the light to pass through, the green color in the background will nullify the effect. Any green color paint would do. As far as possible use a paint that will make the back structure waterproof.
- Draw the Pattern on the Wall.: If you have selected a design that has a number of patterns draw the same on the green color painted wall with the help of chalk. This will make sure the actual installation is close to the design you have done.
- Start the Installation.: Materials that would be required: Hammer, Drilling Machine, Self Drill Screws, Wicer. The Tiles have interlocking capabilities, interlock a number of tiles as per the design and start installing. You can make use of a cutter to cut the tiles. You can do the installation yourself or hire a carpenter to do it for you. It's not a costly affair.
- Installation:


Finishing: After you follow the installation process as outlined above do the final finishing. Check if the tiles are loose somewhere, remove the excess material wherever necessary.
Below are 2 pdf's that would be help.


Leave a comment